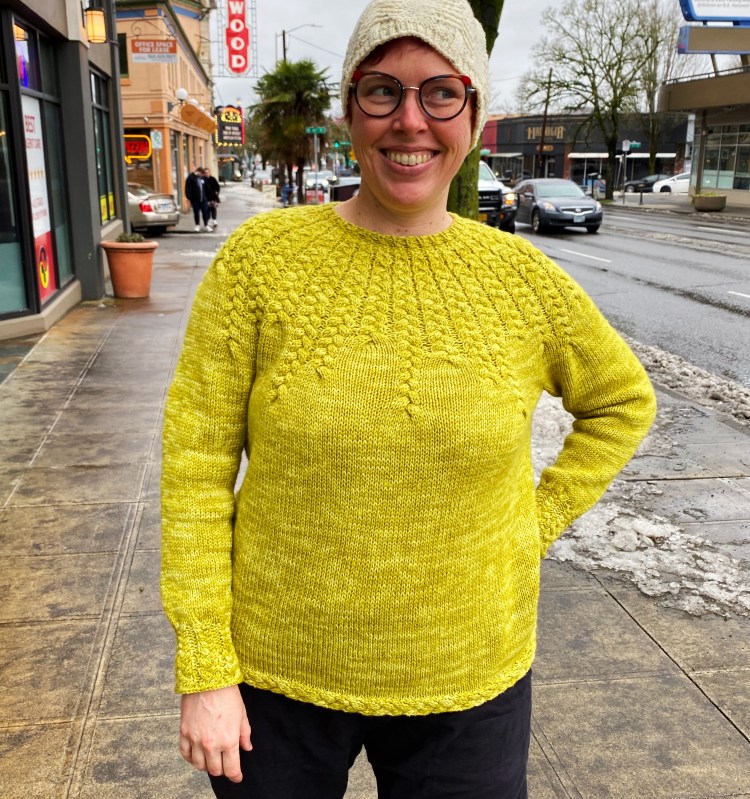
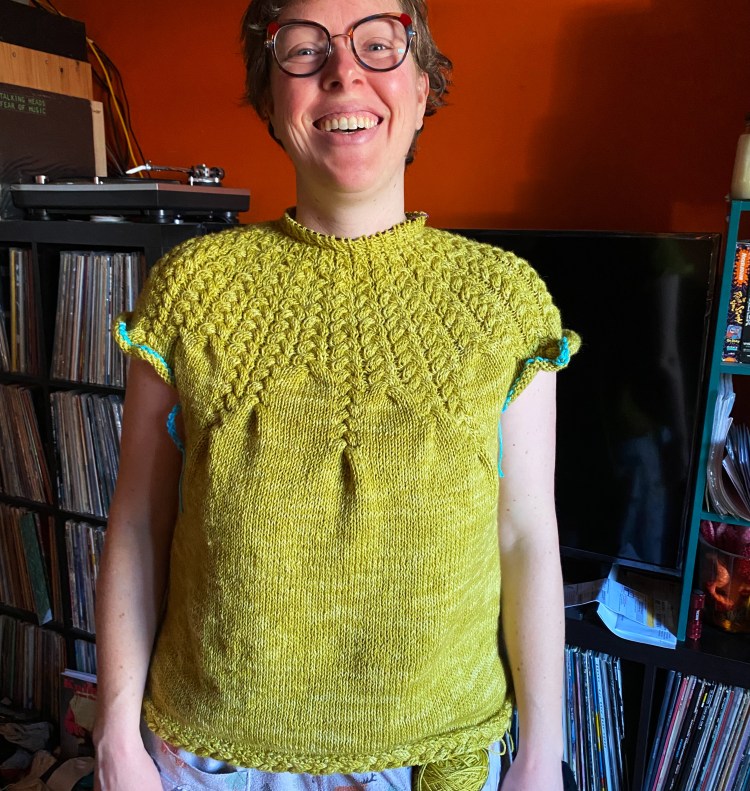
How about some knitting content on this blog?! I started knitting this sweater in summer 2020, with plans for it to be my around-and-around in plain stockinette movie theater sweater when I started going to movies again, once the bottom edging was done. And then I originally had a vague plan to do a simple raglan top, with like a cable design running along the raglan decrease lines. When I actually got to the top years later, I had a new idea to do an all-over cable pattern as a round yoke instead, and it worked!!
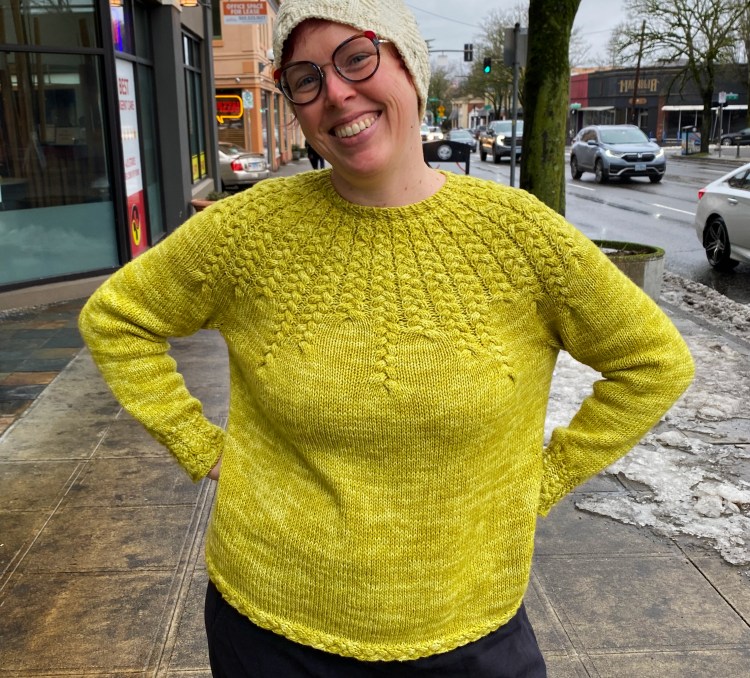
I picked out Hawthorne sock yarn held double, for a worsted-ish weight, in the Cattail colorway. I knit the bottom edging in 2020, then just kinda let it sit, waiting to go back to theaters, since the whole point of it was to be my theater knitting project. That ended up not happening until summer 2023, so I ended up knitting small bits of the stockinette body off and on throughout 2021–2023, then I did knit a few chunks in the theater for Barbie, Talk to Me, and Bottoms… and I finally finished up the body in fall 2023 when I had covid and was wanting a lot of mindless knitting.

Since it worked out so well, I thought I’d share what I did for anyone who might want to try to copy me… The explanation below is based on notes I took for this sweater that I improvised / designed on-the-needles for myself, to fit my own body. With the exception of the bottom edging, this is not a pattern, just me telling you what I did. Adventurous sweater knitters will hopefully be able to use my notes as a starting point or guideline or as inspiration to improvise their own similar sweaters, maybe. If anyone does, I’d REALLY love to see, so please comment here with a link to photos!!
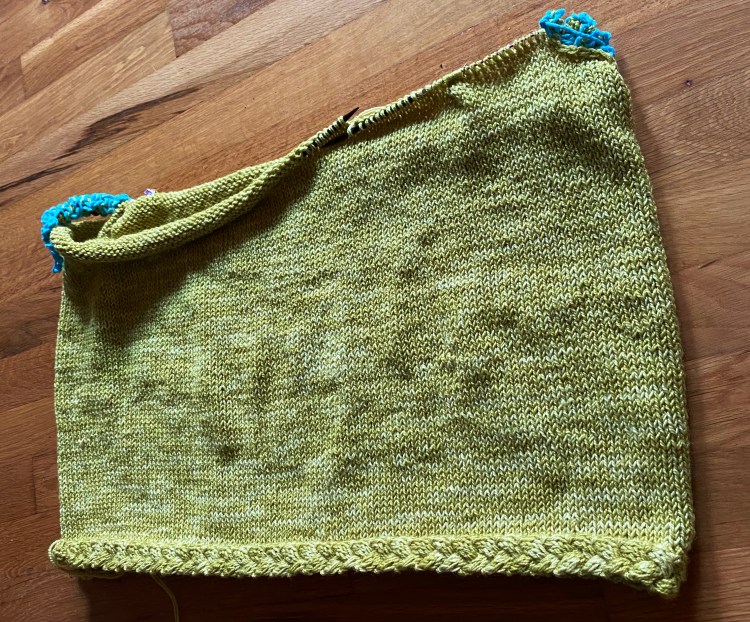
I don’t have any photos of the bottom edge by itself, but it’s constructed the same way as a lot of my old patterns (like this top and this hat and this shawl), what I called the “sideways edge cast-on”—stitches are added along one side across the whole edge so you don’t have to pick them all up later. You basically knit the sideways edge pattern, always increasing 1 stitch at one end (at the beginning of every WS row in this case), and leave the extra stitches on the circular cable for later. Then you’ll increase extra stitches across the first sideways row, which tightens up the sideways stitches and makes the row-to-stitch ratio correct for a smooth edging.

Bottom Edging
Cast on 9 sts.
Setup Row (WS): K1, purl to end.
Row 1 (RS): Cable 2 over 3 Left, K3, Sl1 WYIF.
Row 2 and all WS rows: KFB, purl to end.
Row 3: Sl1, K2, Cable 3 over 2 Right, Sl1 WYIF.
Row 5: Cable 3 over 3 Left, K2, Sl1 WYIF.
Row 7: Sl1, K2, Cable 2 over 3 Right, Sl1 WYIF.
Row 9: Cable 3 over 2 Left, K3, Sl1 WYIF.
Row 11: Sl1, K1, Cable 3 over 3 Right, Sl1 WYIF.
Rep Rows 1–12 until piece is the circumference you want around your body. You may want to put some stitches onto scrap yarn or another circular needle so you can hold the whole piece around your body. Or, determine the final measurement you want the piece to be, measure half or a third of that final measurement along the in-progress piece, count the top stitches, and multiply to determine the final stitch count you want.
My stitch count when I stopped the edging was 144 top stitches, plus 8 working cable pattern stitches, so 152 total stitches.
On the next RS row, bind off 8 stitches (the cable stitches), then K1, (M1, K2) to end.
Stitch count has increased by half of the original stitch count (minus the 8 bound-off stitches). My original stitch count of 144 increased to 216. Piece is now ready to knit stockinette stitch around these stitches.
I worked around in plain stockinette now, until the piece measured my desired length from bottom to underarms.
Then I did some math and decision-making for what to do next. I had this idea for a cabled yoke in my head, and I ended up planning it all out once I had my stitch count figured out.
To start, I bound off for the underarms:
I knit to 6 sts before beginning-of-round, bound off 12 sts, then knit to 6 sts before the halfway point, bound off 12 sts, and knit to end.
My stitch count at this point was 192.
I decided, for my cable pattern plan, to figure out my sleeve count so that my total stitch count was a multiple of 20 (so each half—front and back—was multiple of 10, because I planned to do 9-stitch cables with 1 stitch between). I determined my numbers based on gauge and desired measurement of sleeves at the top…
So my sleeve count total per sleeve was to be 66 stitches, minus the 12 picked-up stitches on each sleeve (those 12 stitches I bound off for the underarms, to be picked back up for the sleeves) = 54 new stitches per sleeve, times 2 = 108 stitches added for the yoke. 108 + 192 (my current stitch count) = 300 stitches total to start the yoke.
So I worked my yoke setup round as follows:
*Provisional Cast On 54 sts with scrap yarn onto left-hand needle, knit across half the provisional sts (27), place marker for new beginning-of-round here, knit other half of provisional sts, then join across to other side of bound-off sts and knit across the half-round to next set of bound-off sts; rep from * (placing second marker for halfway-point), knit to beginning-of-round marker.
My stitch count now = 300 (150 each half).
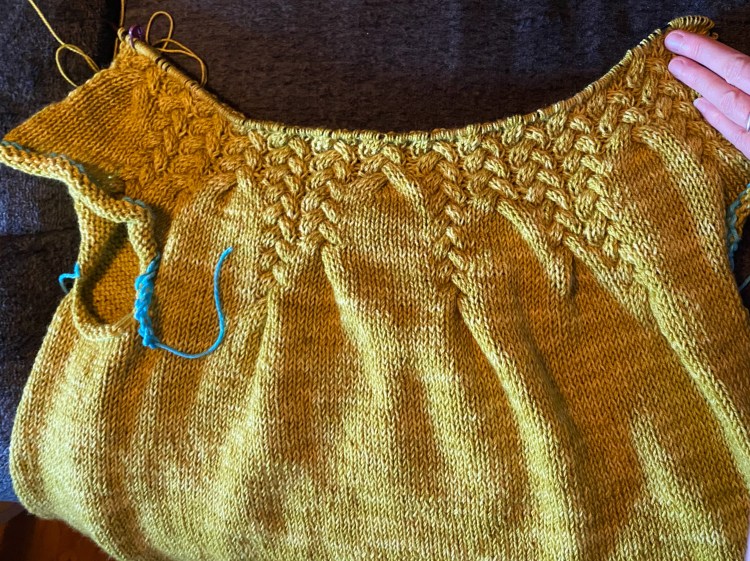
Now that I had my yoke stitches ready to go, I began the cable pattern that I’d planned out. I worked each half (front and back) the same; each half had 150 stitches, so 15 cable segments. Each cable segment was 9 stitches wide plus 1 purl stitch. I added the cables one at a time, and only added the purl stitches once there were two cables next to each other.
My cables started as 3-over-3-over-3 braid style cables, worked as follows.
Rnd 1: Cable 3 over 3 Left, K3.
Rnd 2: Knit all.
Rnd 3: K3, Cable 3 over 3 Right.
Rnd 4: Knit all.

So that’s the basic cable pattern, a 4-row repeat. Since I introduced a new cable on every cable row (every other round), half the cables were introduced with the left cable worked first (Rnd 1), and half with the right cable first (Rnd 3). That way all cables were worked the same, all left cables around the same row, etc. On the “Knit all” cable rows nothing happened with the yoke pattern, so it was just a knit-all round, until the purls started being introduced between the cables (once they filled in enough to be placed next to each other), so then the knit-all rounds became “knit the knit stitches and purl the purl stitches”.
My first four rows were worked as follows.
Yoke Rnd 1: (K40, place marker, Cable 3 over 3 Left, knit to marker) twice.
Yoke Rnd 1: Knit all.
Yoke Rnd 1: (Knit to marker, K3, Cable 3 over 3 Right, K51, place marker, K3, Cable 3 over 3 Right, knit to M) twice.
Yoke Rnd 1: Knit all.
So then I just kept added a new cable on every other round, placing a marker at the cable, until they started being right next to each other with the purl stitches between—then I didn’t place markers anymore because the purl stitches made it clear where each cable started. I had the cables all planned out, so I’d know which one to introduce next. I made this basic spreadsheet chart just to plan out the order of the cables. It’s upside down but the point was just to decide when each cable started, so I could count how many stitches to knit between them on each cable round.

When all the cables had been introduced, there were 15 cables across each front and back (30 total) as well as the same number of single purl stitches between each cable, and back to just 2 stitch markers, one at the beginning and one at the halfway point.
So now I started working decreases, decreasing every other cable on a round, spreading the decrease rounds out more at first, then closer together as I got closer to the top. So half the cables became 8-stitches wide, then the other half, then half became 7-stitches wide, then the other half, and so on. I continued working the cables as braids, so they’d become 3-over-3-over-2, then 3-over-2-over-2, then 2-over-2-over-2, and so on, until they eventually became 1-over-1-over-1 braids.
Note that for the decreasing section that follows, the front and back were no longer exactly identical since there was an odd number of cables on each side.
I kind of experimented with exactly how to work the decreases in the cables, seeing what was easiest while also looking good. It didn’t end up mattering too much exactly how I worked the decreases, in terms of looks. I think it was easiest to decrease in the back-cable section of stitches, so the decrease was hidden under the cable twist. However, I didn’t always have control over where to put the decrease, depending on when the decrease row happened within the cable pattern—at first, you can chose anywhere to decrease, but then you have a 3-over-3-over-2 cable and the next time you decrease it needs to be in one of those 3-stitch chunks, not the 2-stitch, and then when you have a 3-over-2-over-2 cable of course the next decrease needs to happen in the 3-stitch part. So where the decreases were placed would be determined for each cable round, whatever made the most sense.
Here’s vaguely how I worked my yoke decreases.
Rnd 1: Work even (knits as knits and purls as purls).
Rnd 2: Work cable row with every other cable decreasing 1 stitch (15 sts decreased total).
Rnd 3: Work even.
Rnd 4: Cable row with no decreases.
Rnds 5-6: Repeat Rnds 3-4.
Now repeat Rnds 1-4, so every other cable row is a decrease round, switching which half of cables is decreased, until all cables are down to 6-stitches wide (2-over-2-over-2). 210 stitches total.
Continue repeating Rnds 1-4 until all cables become 4-stitches wide on a Rnd 2 repeat, stopping after that Rnd 2.
Now repeat Rnds 1-2 only twice more so all cables are 3-stitches wide (1-over-1-over-1). 120 stitches total.
At this point, I worked some short rows for the back of the neck. I didn’t write down what I did, just worked back and fourth a few times, continuing the 3-stitch cables in pattern as established.

Then I worked 1×1 ribbing for a few rounds, and I bound off using the Tubular Bind off. I was so relieved to try it on at this point and see that it worked!
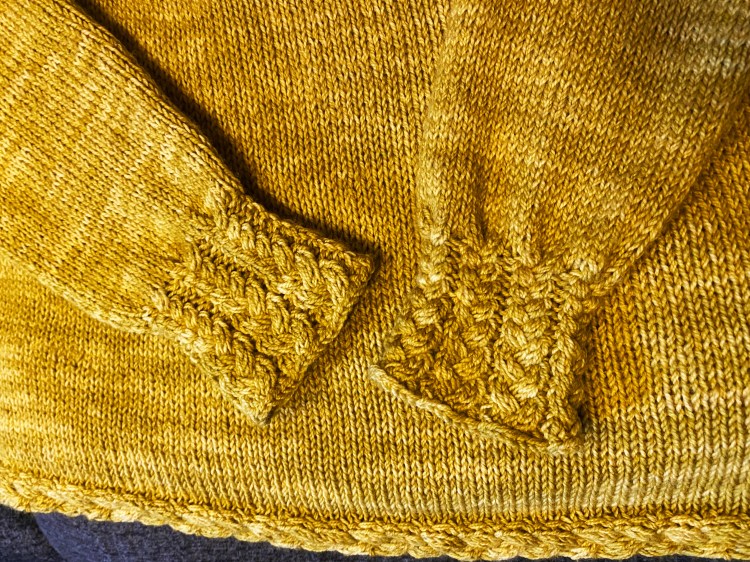
Now the body was done, it just needed sleeves. I put the provisional stitches onto the needles, picked up 12 stitches along the underarms for each sleeve, and starting working stockinette around them, two at a time.
I decreased 2 stitches every 7 or 8 rounds, until they were about 3 inches shorter than my desired final length. At that point, they were each 49 stitches, perfect for dividing into 6-stitch wide braided cables with 1 purl stitch between. I worked 2-over-2-over-2 braided cables with no knit-all rounds between for several rounds, to really pull in the cuffs, then I switched to working a round plain between cables to loosen up the bottoms of the cuffs. This was a weird improvised choice; if I were to re-knit the cuffs now I’d just do the plain row between cable rows for the whole cuffs. Oh well, they turned out find in the end!
And that was it, I weaved in the ends, tried it on… it was good, but didn’t fit PERFECTLY… the neck was a bit tight and the sleeves were a little short.

So when I blocked it, I pulled the neck to stretch it a bit bigger, and I tugged on the sleeves to lengthen them a little, and now it does fit perfectly, yay!! I love it so so so so much.

Btw, the hat I’m wearing in these photos is my Siskiyou pattern in Knitted Wit yarn, one of my most-worn hats in the winter time!

I’ve improvised sweaters before, but just boxy drop-shoulder styles (this pullover and this pullover and this cardigan—these are all in my ravelry projects if you want to see them there) so this was my first shaped garment that wasn’t using a pattern someone designed. I’ve been editing garment patterns for my job for 5 years now, which means I’ve basically been knitting them in my head, so I think I’ve absorbed a lot of garment design basics that help my brain think about how to go about knitting a sweater without a pattern now. I plan to make many more like this, without a pattern, and I may have even cast on and started swatching a new idea for one last night! It’s so fun!

3 thoughts on “My Improvised Cable-Yoke Sweater”